Do you want to create beautiful, blurred backgrounds in your iPhone photos? Blurring the background in your pictures may seem difficult. But in this tutorial, you’ll discover three easy techniques for creating professional-looking photos with background blur. Read on to learn how to blur background on iPhone camera when shooting. And discover how to edit your photos with realistic blur effects.
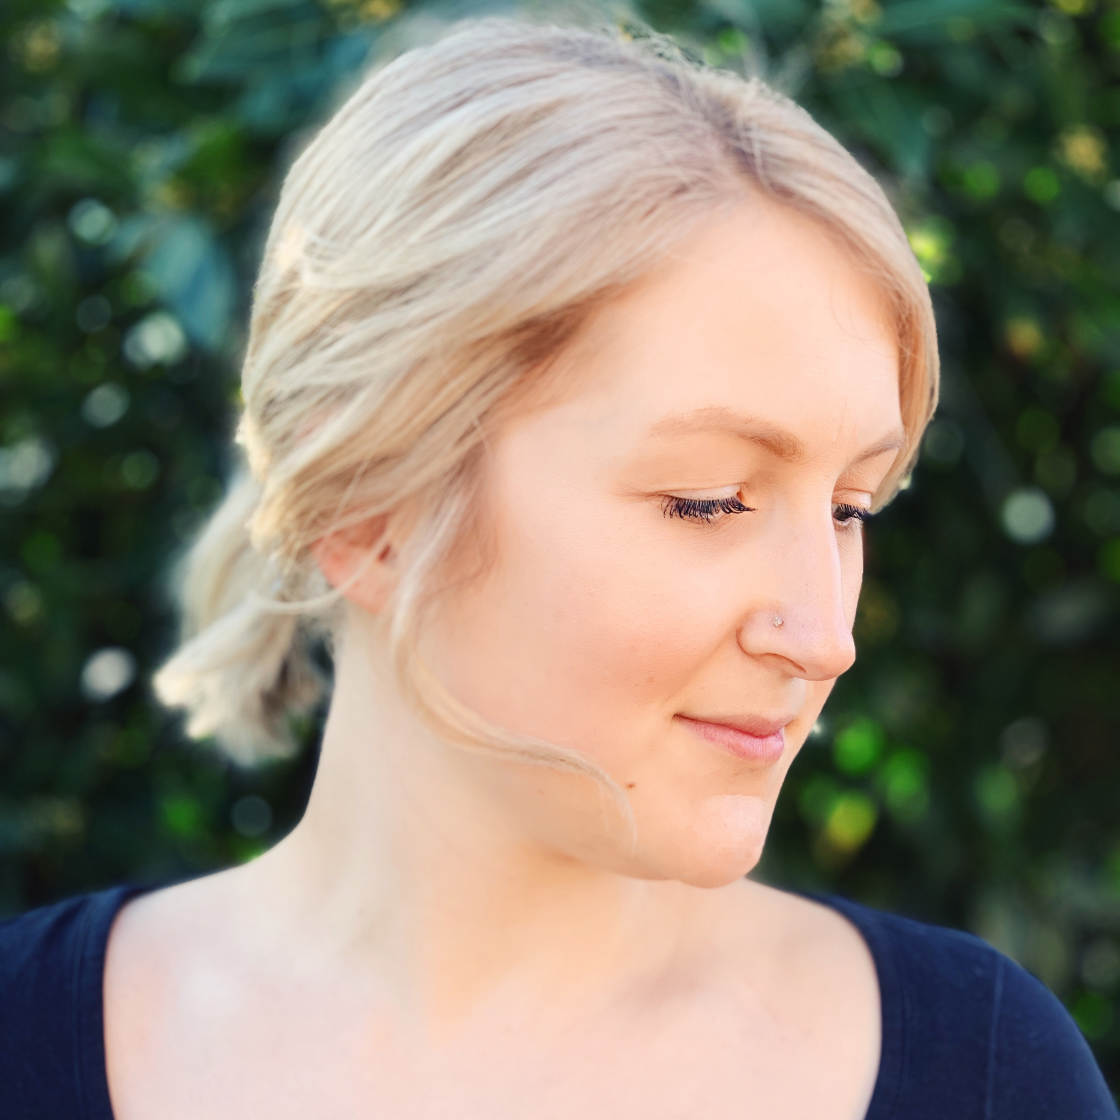
Table Of Contents: How To Blur Background On iPhone
Click any title link below to go straight to that section of the tutorial:
1. Use Portrait Mode To Create Beautifully Blurred Backgrounds
1.1 What Is Portrait Mode?
1.2 How To Blur Background On iPhone Using Portrait Mode
1.3 Edit Or Remove Background Blur In Portrait Photos
2. Get Close To Your Subject To Blur The Background
2.1 Move Closer To Your Subject
2.2 Set The Focus Point Manually
2.3 Getting Closer vs. Portrait Mode
3. Use AfterFocus App To Blur Background In Editing
3.1 Choose A Selection Mode
3.2 Use Smart Selection Mode To Specify Background & Foreground
3.3 Use Manual Mode To Make Precise Selections
3.4 Customize The Blur Effect
1. Use Portrait Mode To Create Beautifully Blurred Backgrounds
Do you want to shoot professional-looking portrait photos where the background appears out of focus?
Portrait mode in the built-in iPhone Camera app offers an easy way to blur the background in your photos.
1.1. What Is Portrait Mode?
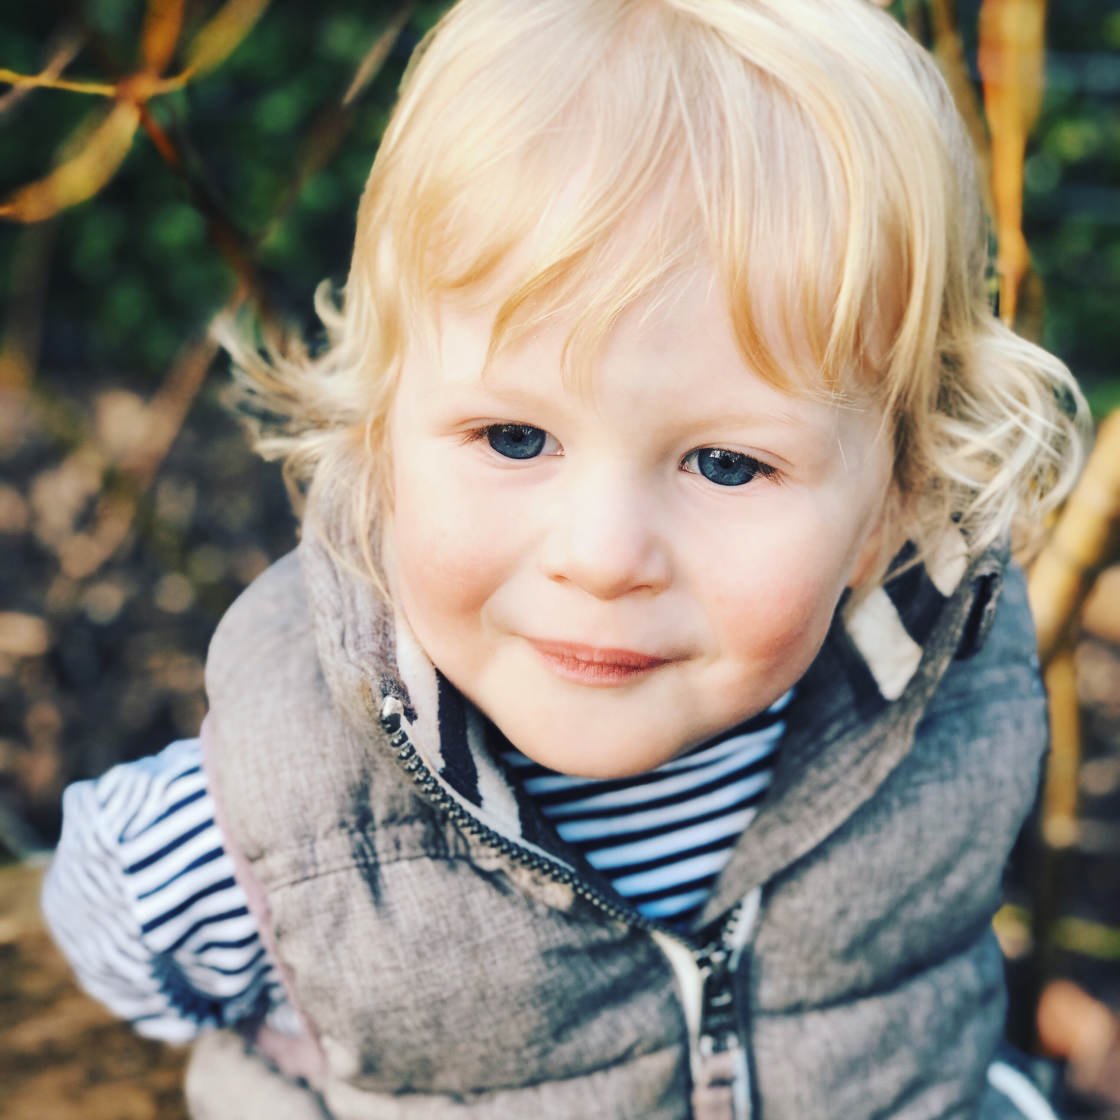
Portrait mode is a shooting mode in the iPhone’s built-in Camera app. It uses depth-effect software to create soft, blurry backgrounds while your subject remains in sharp focus.

As the name suggests, Portrait mode is perfect for shooting portraits of people and pets. But you can also use it to blur the background behind other subjects.

Portrait mode is especially useful when the background is ugly or distracting. Blurring the background creates a more pleasing image and helps your subject stand out.

Portrait mode is available on the new iPhone 11, iPhone 11 Pro, and iPhone 11 Pro Max. You’ll also find it on the iPhone XS, iPhone XS Max, iPhone XR, iPhone X, iPhone 8 Plus, and iPhone 7 Plus.
Unfortunately, Portrait mode isn’t available on the iPhone 8, iPhone 7, or older. But the other techniques covered in this article show you how to create blurred backgrounds with any iPhone.
To learn how to blur background without Portrait mode, jump to section 2 below.
1.2 How To Blur Photos On iPhone Using Portrait Mode
With Portrait mode, it’s easy to create images with dreamy, blurred backgrounds.
Open the Camera app on your iPhone, and select Portrait mode at the bottom of the screen.

Your subject needs to be between two and eight feet from the camera. And there needs to be plenty of light (Portrait mode doesn’t always work in low light conditions).
Compose your photo, and wait for the words Natural Light (or Depth Effect on the iPhone 7 Plus) to appear in yellow.

This indicates that the depth-effect is working, and you’re ready to take your shot.
Check the viewfinder to ensure the depth-effect feature is producing good results. Your subject should appear sharp, and the background should be blurred.
Now simply press the shutter button to take a beautiful portrait photo.

1.3 Edit Or Remove Background Blur In Portrait Photos
Sometimes Portrait mode photos don’t turn out exactly as you’d like.
Maybe you wish the background was more out of focus. Or perhaps you’d like the background slightly less blurred.

Sometimes the camera doesn’t correctly determine which areas are background and which are foreground. For example, it might blur part of the foreground or leave some of the background in focus.
But the great thing about Portrait mode is that you can make changes to the background blur after you’ve taken the photo.
On the iPhone 11, 11 Pro, 11 Pro Max, XS, XS Max, and XR, you can adjust the strength of the background blur.
Start by opening your portrait photo in the Photos app, then tap Edit.

Tap the f/number icon at the top left.

Now drag the Depth slider (beneath the photo) left or right to increase or decrease the blur strength.

On older iPhones, you don’t have the option to adjust blur strength. But you can turn off the depth-effect completely, reverting your image back to the original without any background blur.
To remove the blur, tap the yellow Portrait option at the top of the editing screen. You can switch it back on at any time by tapping Portrait again.

Another interesting feature within Portrait mode is Portrait Lighting (not available on iPhone 7 Plus). Portrait Lighting lets you apply studio lighting effects to your photos.
To experiment with the Portrait Lighting options, tap the Portrait Lighting icon at the top left of the editing screen. Then swipe over the Portrait Lighting icons beneath the image.

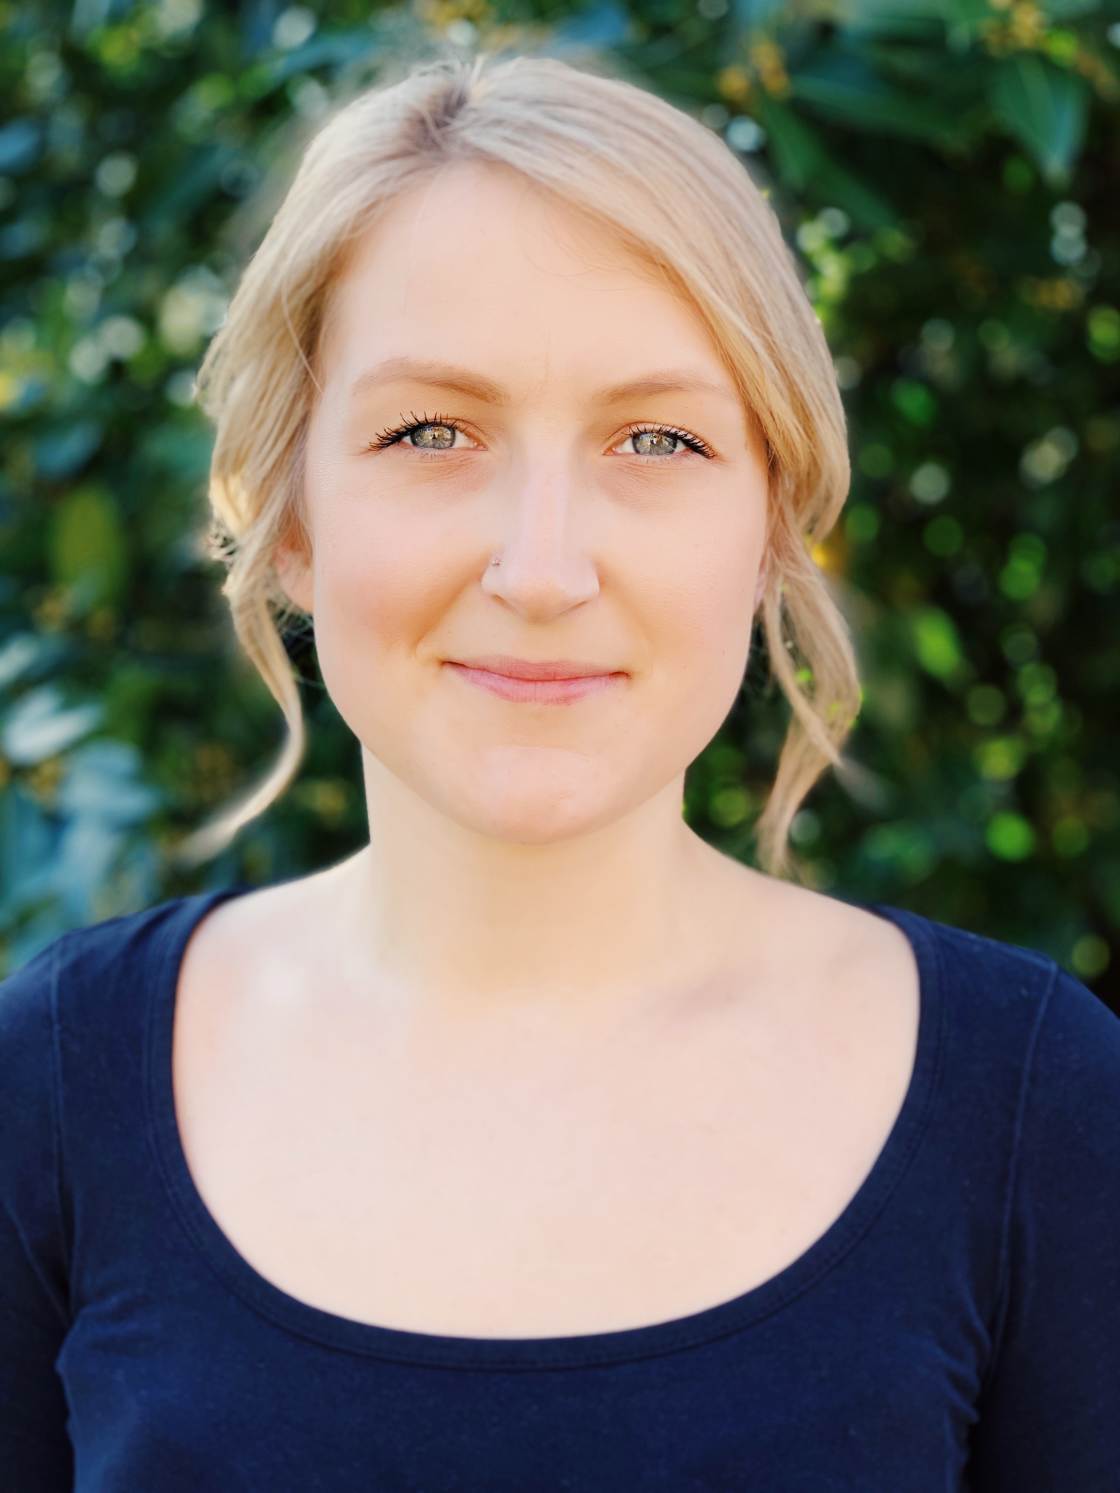
Natural Light is the default Portrait Lighting setting. This option doesn’t apply any lighting effects to your photo.
Studio Light brightens the face of your subject. Contour Light creates shadows for more defined facial features.

Stage Light makes the background completely black. Stage Light Mono is like Stage Light, but it turns your photo black and white. And High-Key Light Mono creates a black and white photo with a white background.

Once you’ve selected the Portrait Lighting effect you want to use, drag the slider to adjust the strength of the effect.

7 Hidden iPhone Camera Features
As it turns out, the most important iPhone camera features are completely hidden from regular iPhone users. That's why we created this free video revealing 7 hidden iPhone camera features that every photographer should use. Click here to watch this video.

2. Get Close To Your Subject To Blur The Background
Do you want to know how to take pictures with blurred background on iPhone without using Portrait mode?
It’s actually really simple! And you can do it on any iPhone – even older models that don’t have Portrait mode.
You just need to get close to your subject.

2.1 Move Closer To Your Subject
This little-known technique is a guaranteed way to create amazing blurred backgrounds in your photos.
The closer you get to your subject, the blurrier the background becomes.

To test out this technique with your own iPhone, find a subject that you’d like to photograph.
Make sure the subject isn’t too close to the background, otherwise the background won’t appear blurred. The further the background is from the subject, the more blurred it will appear.

Start by holding your iPhone a few feet away from the subject. Now slowly move your phone closer to the subject. Notice how the background gradually appears more blurred the closer you get.

If you get too close to the subject, the camera won’t be able to focus at all. When this happens, the subject will appear blurred. You need to be far enough away to ensure the subject looks crisp and sharp, but close enough to blur the background.

You also need to ensure the background has some detail that can be blurred. If you’re shooting against a plain white wall, there won’t be any detail for the camera to blur.

2.2 Set The Focus Point Manually
When shooting close-up photos, the depth of field is shallow. This means that only a small part of the image from front to back is in sharp focus, and the rest of the scene appears blurred.

So it’s essential you tell the camera which part of the scene to focus on. If you don’t, the camera might focus on the wrong part of the scene and your subject will be blurred.
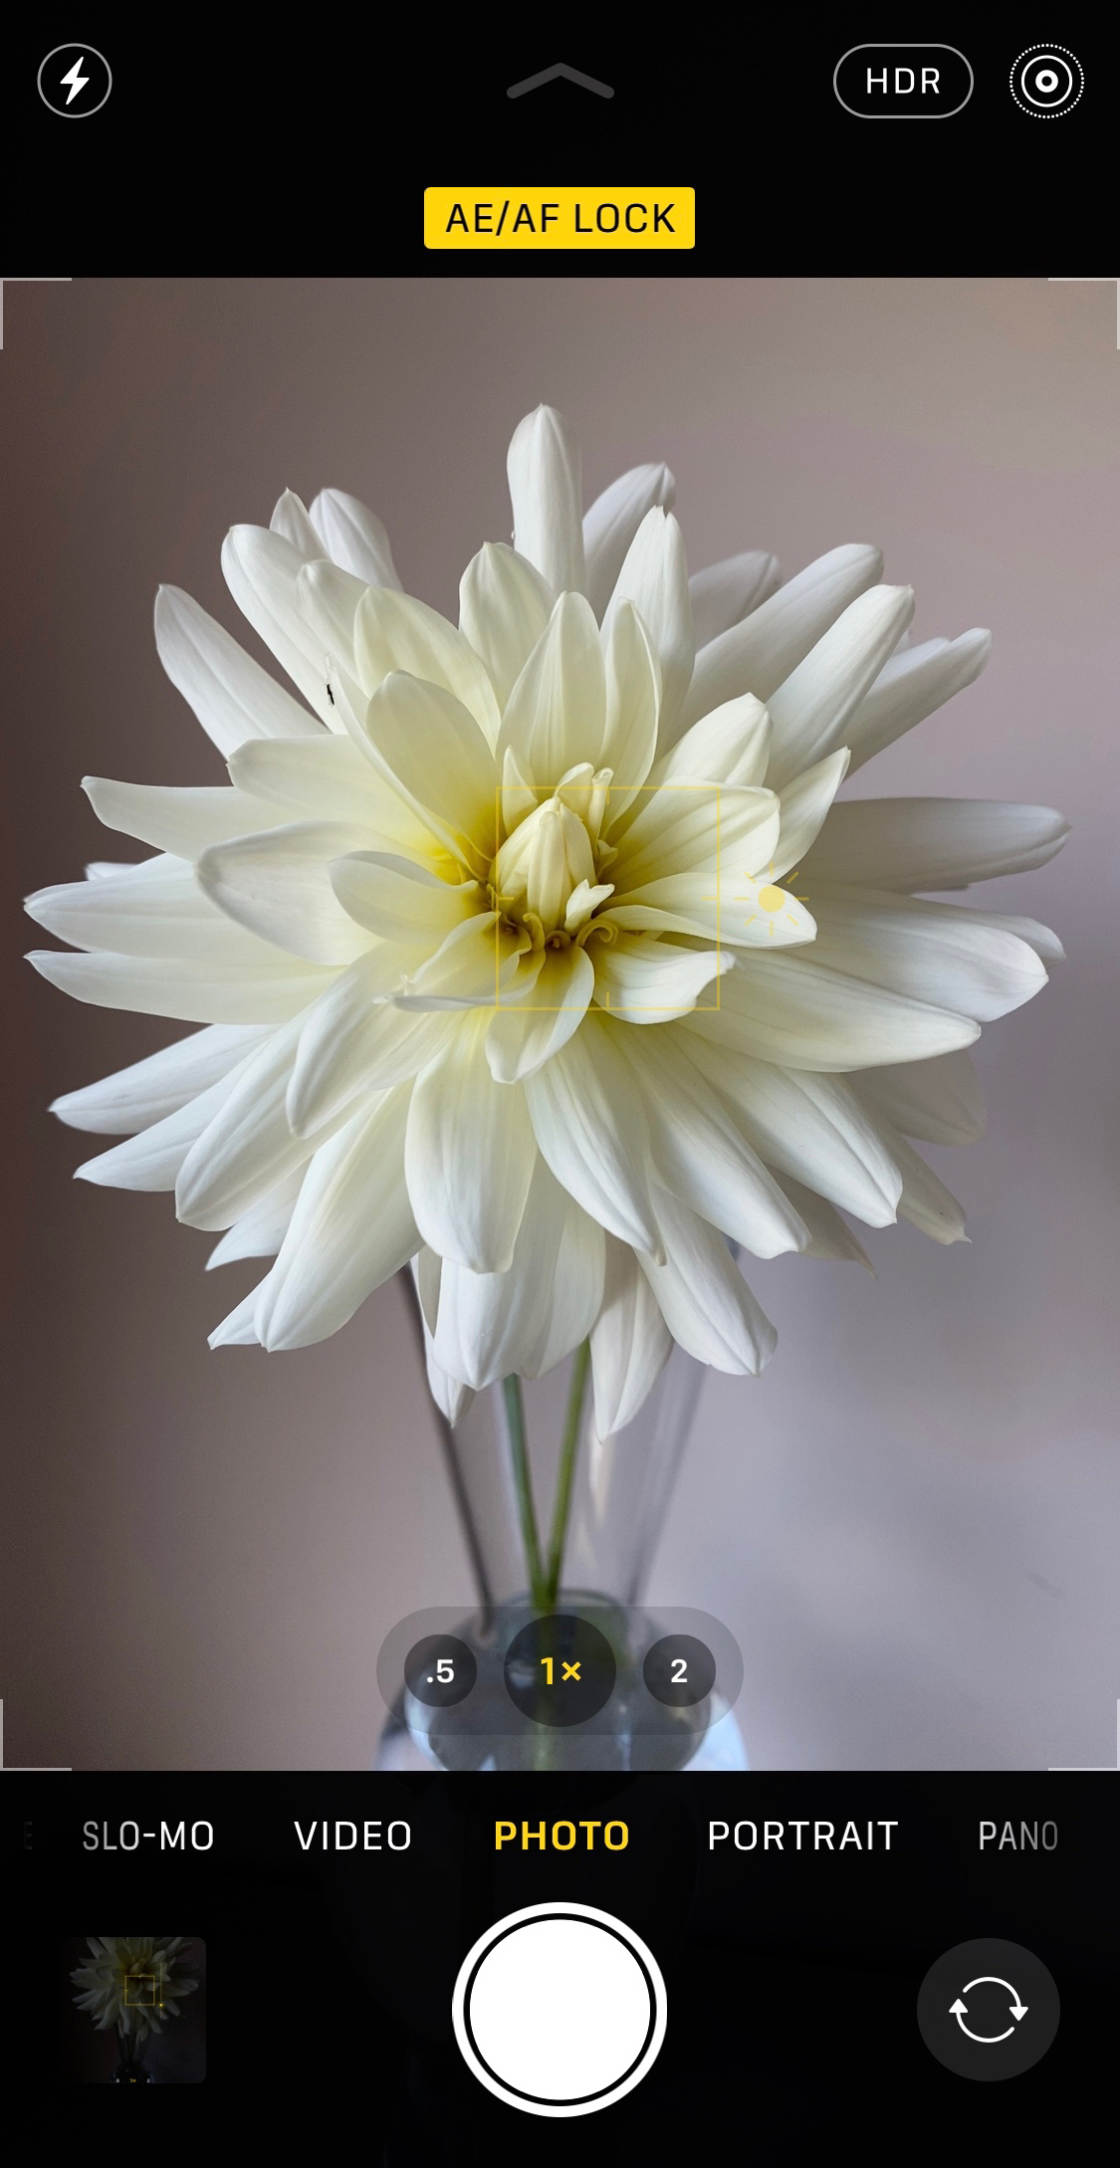
To set the focus point on your subject, simply tap that area of the screen. A yellow box indicates the focal point.

Alternatively, you can lock focus. This allows you to take multiple shots of the subject without having to reset the focus point each time. To lock focus, tap and hold for a couple of seconds until you see AE/AF Lock.
If the background doesn’t look blurred after setting focus on your subject, try moving closer. Ensure you tap to reset focus every time you change the distance between the camera and subject.
2.3 Getting Closer Vs. Portrait Mode
Getting closer to your subject works with any camera, including all models of iPhone.
Why? Because the shallow depth of field is created optically by the lens, rather than digitally in software.

If your iPhone has Portrait mode, it might be tempting to use this every time you want a blurred background. But in certain situations, it would be better to use the “getting closer” technique.
The main benefit of getting closer to your subject is that you’re not relying on software to decide what should be in focus and what should be blurred. You’ll get good results every time, as long as you’re close enough to the subject and you set focus correctly.

Another benefit of getting closer to your subject is that you can easily change which part of the scene is in focus.
So if you want the background in focus and the foreground blurred, just tap the background area.
Or try tapping somewhere in the middle ground to set focus at that point. In the photo below, the foreground and background appear blurred, while the pebbles in the middle ground are in sharp focus.

3. Use AfterFocus App To Blur Background In Editing
Have you ever taken a photo and wished it had a blurred background? Maybe the background is messy or ugly. Or perhaps the subject doesn’t stand out well.
In such cases, you can use an editing app to blur background on iPhone after you’ve taken the picture.
Below you’ll learn how to blur a picture on iPhone using the AfterFocus app.
Open the AfterFocus app, then tap Select Photo. Open the album containing the image you want to use. Locate the photo and tap to open it.

When you first open a photo in AfterFocus, some helpful tips will appear. Swipe across to read each tip, then tap the X at the top left to exit.
3.1 Choose A Selection Mode
There are two modes for selecting the areas you want to blur: Smart Selection mode and Manual Selection mode.
Smart Selection mode lets you quickly select the areas you want in focus and blurred. You draw lines to specify which area is background and which is foreground. You don’t have to be too precise. The app will work its magic to blur the background while keeping the foreground sharp.

With Manual Selection mode, you need to be precise. You have to “paint” over all areas that you want in focus. If you make a mistake and select some of the background, you have to erase that part of the selection.

Often you’ll need to use a combination of both selection methods. It’s best to start with Smart Selection to roughly select the background and foreground areas. Then use Manual Selection to tidy up any edges where the selection isn’t perfect.
How do you switch between Smart and Manual Selection mode? Tap the Pencil icon at the top right to switch to Manual Selection mode. And tap the Wand icon to switch to Smart Selection mode.

Note that if you use Manual mode to make a selection, you’ll lose your selection if you switch back to Smart mode.
3.2 Use Smart Selection Mode To Specify Background & Foreground
Ensure you’re in Smart Selection mode. You’ll see the Pencil icon at the top of the screen when you’re in Smart mode.
Tap the Focus icon at the bottom of the screen. With your finger, draw a line inside the area that you want to keep in sharp focus. This would normally be your subject in the foreground.
Now tap the Background icon at the bottom of the screen. Draw a line around the inner part of the background.

When you release your finger, the foreground area appears with a red mask. This indicates the area that won’t get blurred. The white line indicates the area you want in focus. The black line indicates the area you want to blur.

Draw more lines to define foreground and background areas if necessary.
There’s also a Mid icon at the bottom of the screen. You can use this on photos that have a clear definition between foreground, middle ground, and background.
The area you select as middle ground will be blurred, but the blur strength won’t be as strong as the background blur. This creates a more gradual blur from foreground to background.
If you make a mistake when drawing the lines, you have two options: Tap Undo (curved arrow icon) at the top of the screen to get rid of the line completely. Or use the Eraser icon at the bottom of the screen to erase part of the line.
The Smart Selection tool is great for quickly defining foreground and background areas. But it doesn’t always get it perfect, especially around the edges of the subject.
To see the edges of your selection in more detail, you’ll need to zoom in on the image. First, tap the Pan & Zoom icon. Then pinch outwards to zoom in. Drag your finger to pan across to a different part of the image.

In the screenshot above, some of the leaves in the background have been selected as foreground. Remember, the red mask indicates the area that won’t get blurred.
To fix this problem, you could try drawing more background lines over the leaves. But if you get too close to the subject’s hair, the hair might get selected as background too. This has happened in the screenshot below.

In cases like this, you’ll need to use Manual Selection mode to make precise selections around the edge of your subject.
3.3 Use Manual Mode To Make Precise Selections
Tap the Pencil icon to switch to Manual Selection mode.
Next, tap Pan & Zoom. Then pinch to zoom in on the area you want to work on.
Tap the Brush Size icon. Select a brush size suitable for the area you need to select. If you’re selecting a small area, choose the smallest brush size.

To select an area of background, tap the Background icon. Use your finger to precisely paint over the background area that you want blurred. The red mask will disappear as you paint over it.
To select a part of your subject or foreground, tap the Focus icon. Paint over the area you want to keep in focus. The red mask will appear as you paint. Remember, the red mask indicates which parts of the final image will be in focus.
Your aim is to have the red mask only on the foreground subject that you want in focus.

If you make a mistake, tap the Undo icon (curved arrow). Or switch between the Focus and Background icons to paint over areas where you made a mistake.
It’s worth spending a bit of time getting your selection as precise as possible. If you don’t make a neat selection, the final result won’t look realistic when the background gets blurred.
Once you’re happy with the selection, tap the arrow at the top right of the screen. The area you selected as background will now appear blurred.

If you notice any mistakes with your selection, tap the single left arrow at the top of the screen. You can now fine-tune your selection using the Focus and Background tools. Tap the right arrow to return to the blur effects screen.
3.4 Customize The Blur Effect
The icons at the bottom of the screen let you customize the blur effect.
Tap the Blur icon. Here you can choose between Lens Blur and Motion Blur.

Lens Blur is the type of blur you get when you shoot with a shallow depth of field. Motion blur is the kind of blur you get when there’s movement in the scene, or when the camera moves as you take the shot. In most cases, you’ll want to select Lens Blur.
Use the slider to control the blur strength. Slide left for less blur, or right for more blur.
Keep the Edge Feature checkbox switched on. This ensures a smooth transition between the focused and blurred areas.
The Aperture icon lets you select different shaped apertures, which subtly change the blur effect. Switch on Bokeh if you want small hexagons of light to appear in the background of your image.

The Fading BG icon lets you create a gradual transition in blur from top to bottom.
You wouldn’t use this setting for a portrait photo. It wouldn’t look right if the top and bottom parts of the background appear blurred while the middle is in focus.

But this tool can be useful for creating a fake miniature tilt-shift effect, as shown in the example below.

If you wish, you can use the FX icons to apply filters or make adjustments to color and brightness.

When you’re happy with your edit, you can save the image to your photo library. Tap the down arrow at the top of the screen. Click Yes on the message asking if you’d like to save.

The edited photo with blurred background will save into the Photos app on your iPhone.
Below is the final edited image created with the AfterFocus app. The background has a beautiful, soft blur, while the subject remains sharp. The original photo is shown beneath for comparison.
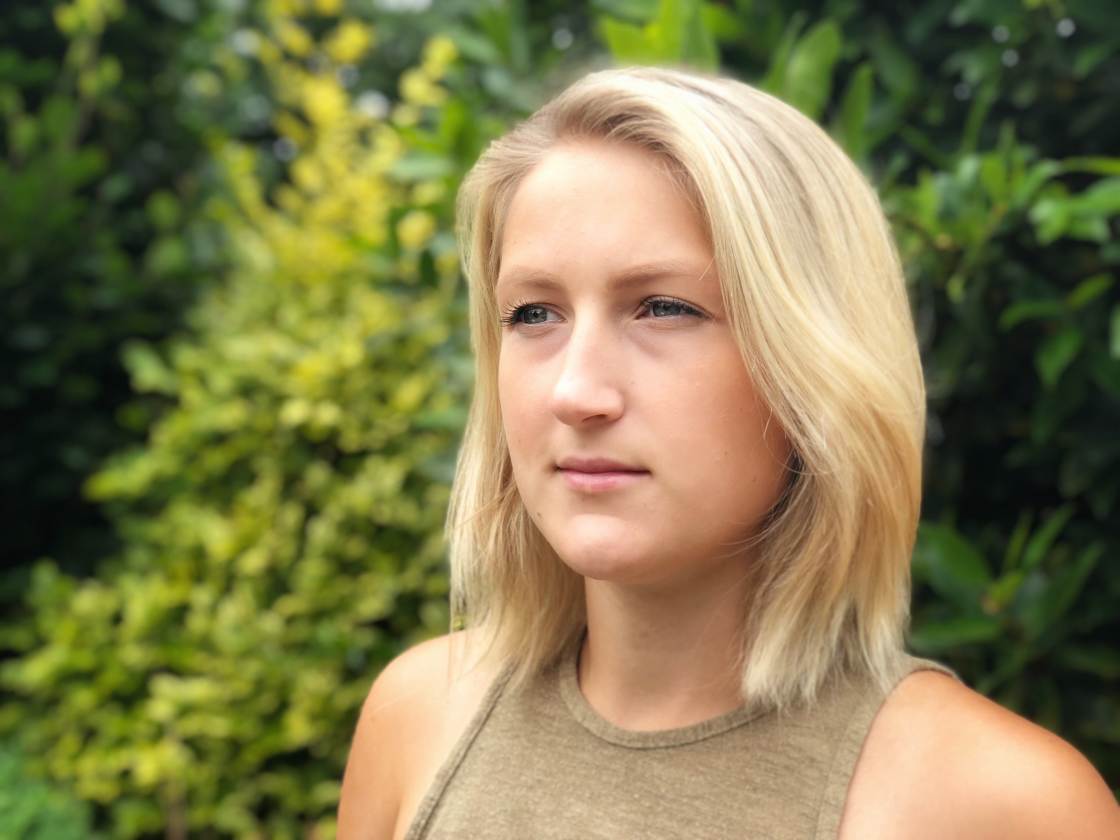 Background blur created using AfterFocus App
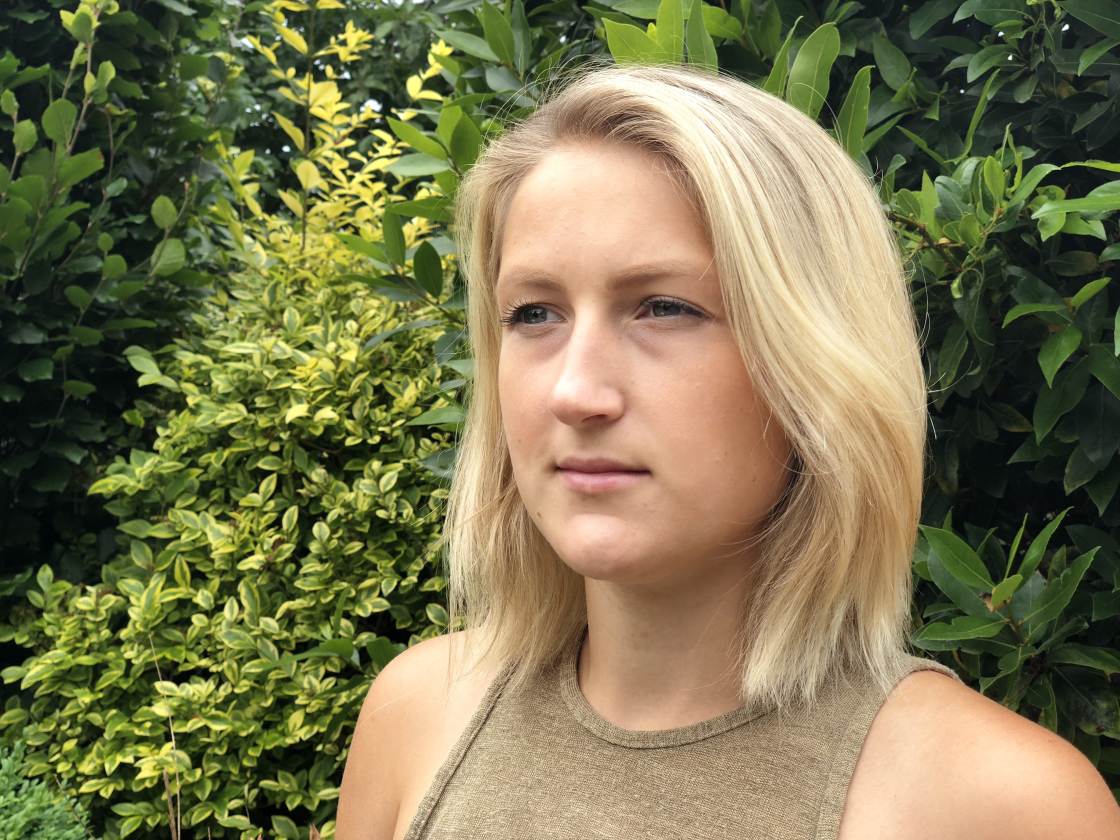 Original Image
The post How To Blur Background In Your iPhone Photos: The Ultimate Guide appeared first on iPhone Photography School.


